HFish API Configuration Documentation
Open-Source Threat Intelligence Example: ip_list
honeypot-blocklist Project Repository
Planning
The most essential characteristic of a honeypot is this: no legitimate business traffic should ever access it. Therefore, any data entering a honeypot is essentially “suspicious” or “malicious” by nature. This gives honeypot-collected data an extremely high signal-to-noise ratio (high fidelity).
A honeypot can capture basic attacker information and convert it into Indicators of Compromise (IOCs):
- Attacker source IP addresses: Identify where attackers come from (country, ASN, proxy pool).
- Malicious file hashes (File Hash): MD5/SHA256 of uploaded malware samples.
- Malicious domains/URLs: Addresses of C2 (Command and Control) servers contacted by malware.
- Purpose: Synchronize this data in real time to firewalls (FW), WAFs, or intrusion detection systems (IDS), enabling “attacked once, blocked everywhere.”
This article demonstrates how to automatically extract attack information obtained from the HFish honeypot through its built-in API, and distribute it via GitHub/Gitee Pages. (Using simple attacker source IP extraction as an example.)
Architecture Design
Data source: An HFish honeypot deployed on an internal or public network.
Deployment tutorial: Full Guide to Deploying an HFish Honeypot on a Cloud Server
Processing center: An intermediate server running a Python script (this can be the HFish host itself).
Publishing platform: GitHub or Gitee (using their Pages service to host static text files). ( GitHub )
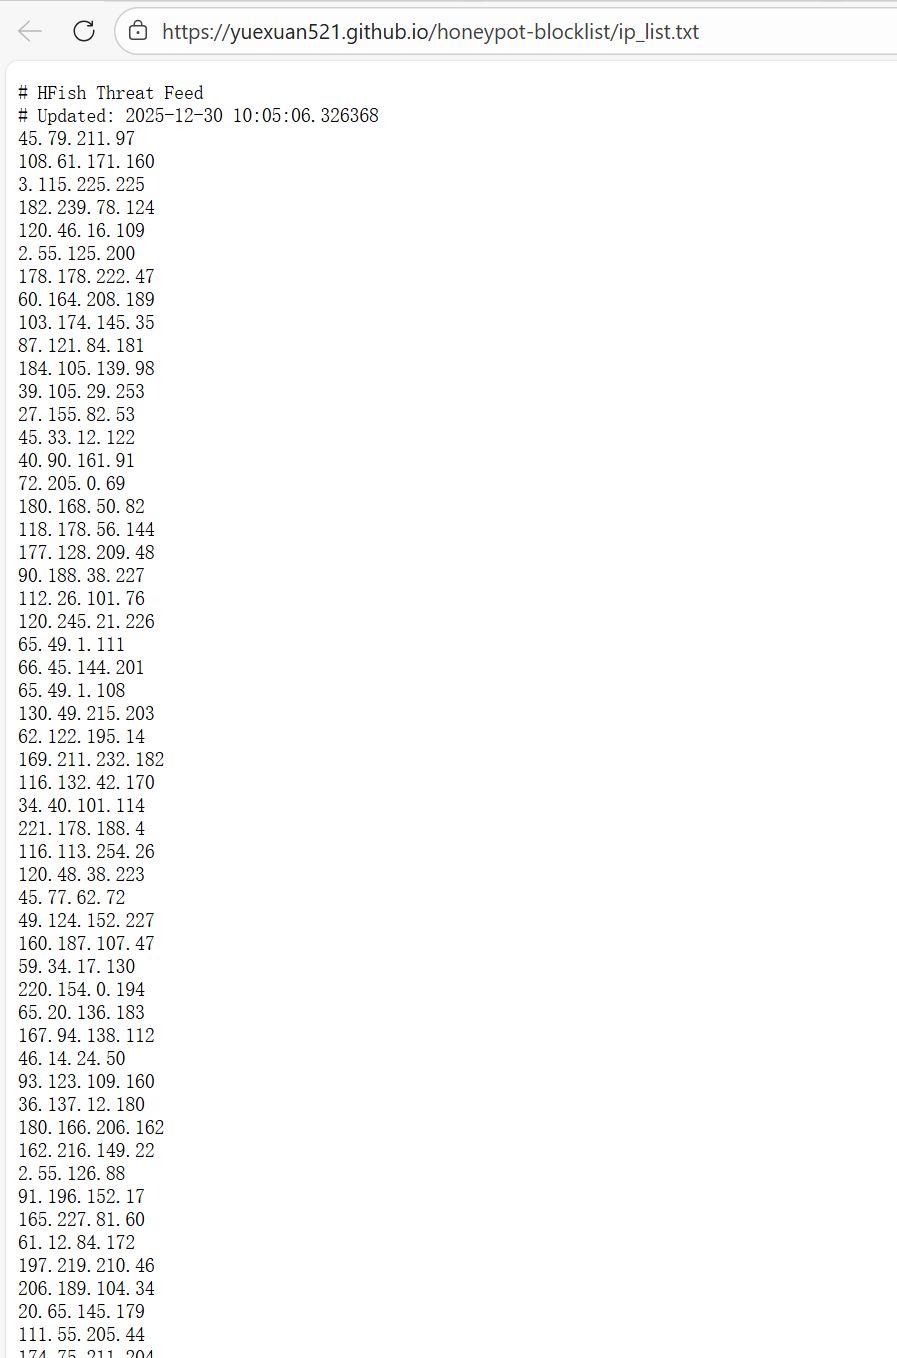
Final output: A publicly accessible URL (for example: https://yuexuan521.github.io/honeypot-blocklist/ip_list.txt).
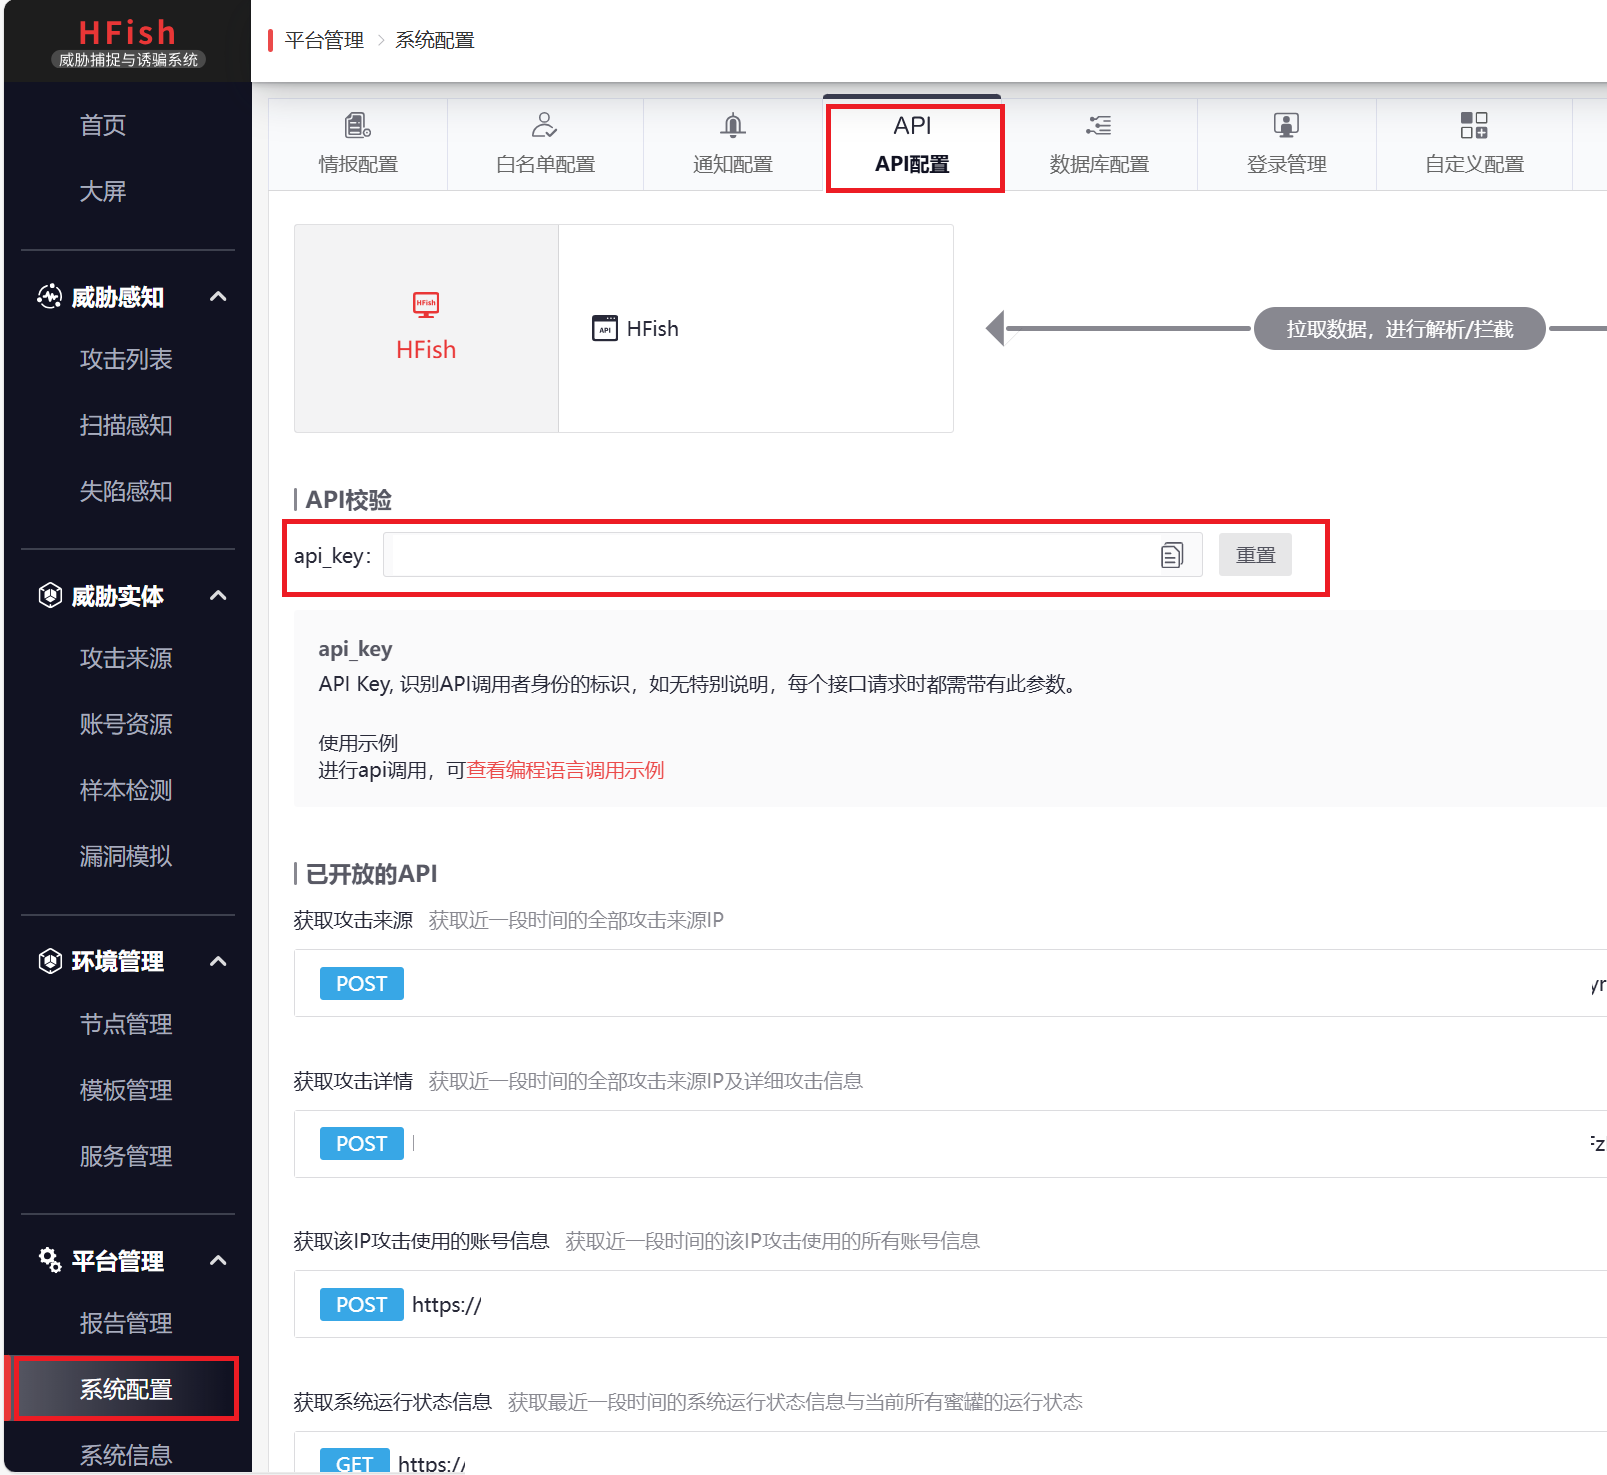
Step 1: Prepare the HFish API
HFish provides an API for retrieving attack data.
- Log in to the HFish admin panel.
- Go to “System Settings” -> “API Settings”.
- Obtain the API Key and admin panel address.
- Note: If your HFish is deployed on an internal network, make sure the machine running the script can access the HFish admin port (default: 4433).
Step 2: Write the Automated Extraction Script (Python)
We need to write a Python script to perform the workflow: “fetch data -> filter whitelist -> format -> write to file”.
Create /root/generate_feed.py on the HFish server or a machine that can access HFish: (you need to modify the values of HFISH_HOST, API_KEY, and OUTPUT_TXT on line 10)
| |
Modify the Python script configuration above so that the output path points to this Git directory.
Step 4: Automate Updates and Pushes (Shell + Crontab)
1. Write the Automation Shell Script
Write a Shell script named update_feed.sh to combine “generate” and “push” into one workflow:
Create the script file:
1vim /root/update_feed.shAdd the following content: (you need to modify
git user.nameanduser.email; ✅ using the privacy email provided by GitHub is recommended)Benefits of GitHub privacy email: It protects your real email address from being exposed, while still allowing GitHub to recognize that this is your account and award “green squares” on your GitHub Contributions Graph.
- Log in to GitHub and go to Settings -> Emails.
- Check “Keep my email addresses private”.
- You will see an email like this:
12345678+yourusername@users.noreply.github.com.

Configuration method: (modify step 5, Configure Git identity)
1
2
git config user.name "Your GitHub username" git config user.email "12345678+yourusername@users.noreply.github.com"1 2 3 4 5 6 7 8 9 10 11 12 13 14 15 16 17 18 19 20 21 22 23 24 25 26 27 28 29 30 31 32 33 34 35 36 37 38 39 40 41 42 43 44 45 46 47 48 49 50 51 52 53 54 55#!/bin/bash # ================= Path Configuration ================= PY_SCRIPT="/root/generate_feed.py" GIT_REPO="/root/threat-feed" LOG_FILE="/var/log/hfish_feed.log" # ====================================================== echo "-----------------------------------------------------" >> $LOG_FILE echo "[$(date)] Starting update process..." >> $LOG_FILE # 1. Enter the Git repository directory (this must be done first) cd $GIT_REPO || { echo "[Error] Cannot cd into $GIT_REPO" >> $LOG_FILE; exit 1; } # 2. [New] Pull remote updates first (to avoid push conflicts) # This will sync changes such as README edits made on the GitHub web page to the local repo echo "[-] Pulling remote changes..." >> $LOG_FILE if git pull origin main >> $LOG_FILE 2>&1; then echo "[Info] Git pull successful." >> $LOG_FILE else # If pull fails (rare), it is usually due to conflicts; log it but do not exit, and still try to push echo "[Warn] Git pull failed (Conflict?). Will try to push anyway." >> $LOG_FILE fi # 3. Run Python to extract IPs # Note: even if git pull fails, we still need to generate new data because the data is the core /usr/bin/python3 $PY_SCRIPT >> $LOG_FILE 2>&1 # 4. Check whether the file was generated if [ ! -f "ip_list.txt" ]; then echo "[Error] ip_list.txt missing. Python script failed?" >> $LOG_FILE exit 1 fi # 5. Configure Git identity git config user.name "" //!!Fill in your name and email here!! git config user.email "" # 6. Commit and push git add . if git commit -m "Auto update: $(date "+%Y-%m-%d %H:%M")" >> $LOG_FILE 2>&1; then echo "[Info] Changes committed." >> $LOG_FILE # Try to push if git push origin main >> $LOG_FILE 2>&1; then echo "[Success] Pushed to GitHub." >> $LOG_FILE else echo "[Error] Git Push failed. Retrying with --force..." >> $LOG_FILE # If a normal push fails, try force push (use with caution, but it is feasible in this append-only threat feed scenario) # git push -f origin main >> $LOG_FILE 2>&1 fi else echo "[Info] No changes detected. Nothing to push." >> $LOG_FILE fiGrant execute permission:
1chmod +x /root/update_feed.sh
2. Configure Passwordless SSH Push (Critical!)
When the automation script runs in the background, it cannot manually enter a GitHub username or password. You must configure an SSH Key.
Check whether a key already exists:
1ls ~/.ssh/id_rsa.pub- If the file exists, skip step 2.
- If not (you get an error), proceed with step 2.
Generate a key (just press Enter all the way through):
1ssh-keygen -t rsa -b 4096 -C "hfish-feed"Get the public key:
1cat ~/.ssh/id_rsa.pub- Copy the output content (the long string starting with
ssh-rsa).
- Copy the output content (the long string starting with
Upload it to GitHub:
Open the GitHub repository -> Settings -> Deploy keys -> Add deploy key.
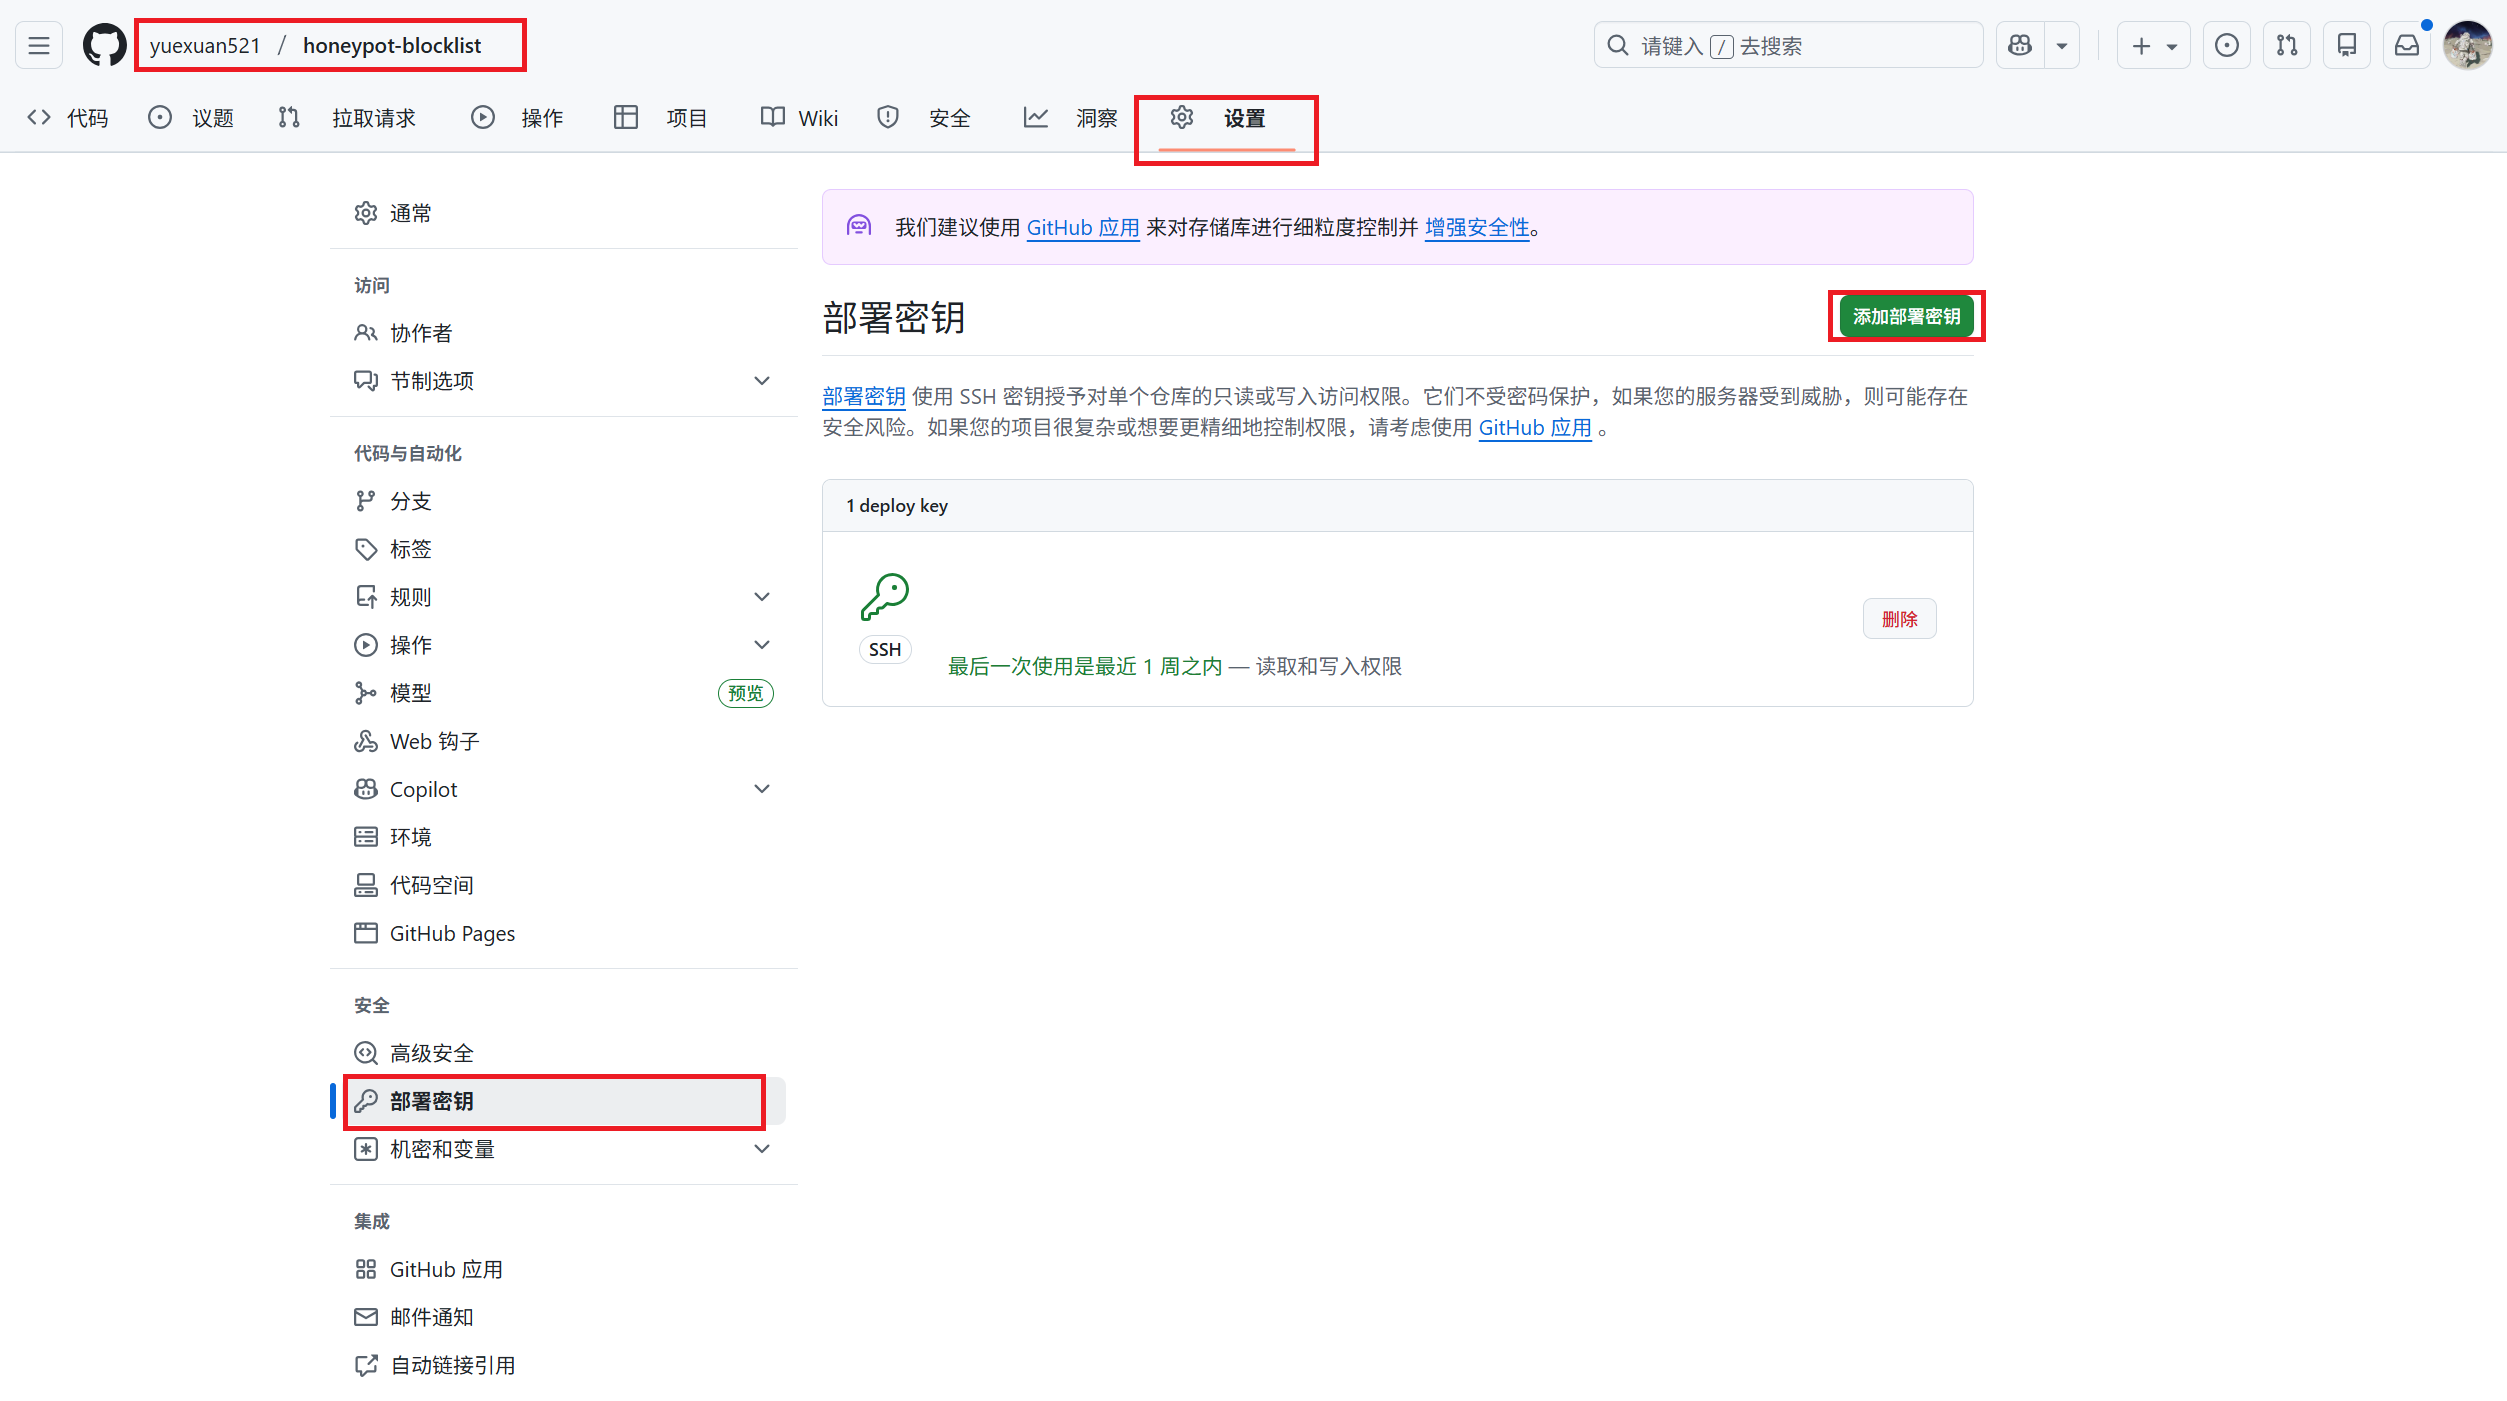
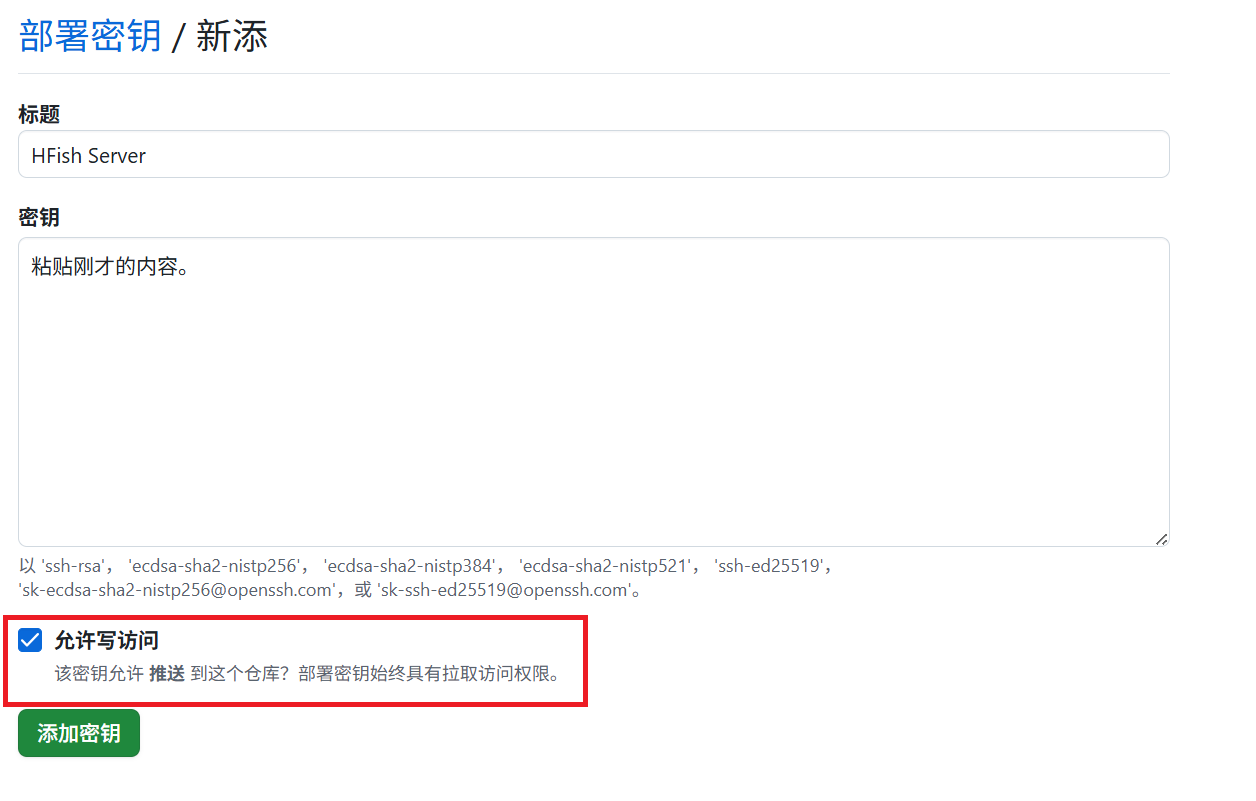
Title: HFish Server
Key: Paste the content you copied just now.
Important: Check Allow write access, otherwise pushing will fail!
Manually test the connection (this must be done once!): Run on the server:
1ssh -T git@github.com- Type
yesto confirm the fingerprint. - If you see
Hi <username>/<repo>! You've successfully authenticated..., it means the connection works.
- Type
Change the repository remote to SSH (if you cloned using HTTPS before): Enter the directory and check:
1
2
cd /root/threat-feed git remote -vIf it shows
https://github.com/..., run:1git remote set-url origin git@github.com:yourusername/your-repository-name.git
3. Manually Test the Full Workflow
Now let’s run the Shell script manually once and see whether it can push successfully.
| |
Check the results:
- Check the log:
tail -f /var/log/hfish_feed.log - Check the GitHub web page: refresh your repository and see whether the update time of
ip_list.txtbecomes"Just now".
4. Set Up a Scheduled Task (Crontab)
After confirming that the manual run works correctly, the final step is to let it run automatically. We will set it to update once every 2 hours (to keep the feed fresh without wasting resources).
Edit the scheduled tasks:
1crontab -eAdd the following line at the end of the file:
1
2
# Run once at minute 5 every 2 hours (staggered execution) 5 */2 * * * /bin/bash /root/update_feed.shSave and exit (if using
vim, press Esc, type:wq, and press Enter).
Step 5: Open It Up for Others to Use
Now, your GitHub repository will contain ip_list.txt. You need to enable GitHub Pages (turn it on in the repository’s Settings -> Pages).
- Go to the repository Settings.
- Find Pages in the left sidebar.
- Under Build and deployment, choose Source as
Deploy from a branch. - Under Branch, choose the
main(ormaster) branch, and select the folder/ (root). - Click Save.
Once enabled, you will get a globally accessible permanent direct link, for example: https://yourusername.github.io/honeypot-blocklist/ip_list.txt
After waiting 1–2 minutes, GitHub will generate the page, and others only need to subscribe to this URL ending in .txt.
Others can use our data like this:
- Palo Alto / Fortinet firewalls: Create an “External Dynamic List” and fill in your URL.
- Linux servers: Write a script to
wgetyour file and import it intoipset.
Effect demonstration: