规划
蜜罐(Honeypot)最核心的特点是:没有任何正常的业务流量会访问它。因此,凡是进入蜜罐的数据,本质上都是“可疑”或“恶意”的。这使得蜜罐收集到的数据具有极高的信噪比(高保真)。
蜜罐可以捕获攻击者的基础信息,将其转化为入侵指标(IOCs):
- 攻击源 IP 地址:识别攻击者来自哪里(国家、ASN、代理池)。
- 恶意哈希值(File Hash):上传的恶意软件的 MD5/SHA256。
- 恶意域名/URL:恶意软件回连的 C2(命令与控制)服务器地址。
- 用途:将这些数据实时同步给防火墙(FW)、WAF 或入侵检测系统(IDS),实现“一处被攻,全网封禁”。
本文即是实现将Hifsh蜜罐获得的攻击信息,通过使用其自带的 API 接口进行自动化提取,并利用 GitHub/Gitee Pages 进行分发。(提取简单的攻击源 IP 地址为例)
架构设计
数据源:部署在内网或公网的 HFish 蜜罐。
部署教程:云服务器搭建HFish蜜罐全流程
处理中心:一个运行 Python 脚本的中间服务器(可以是 HFish 本机)。
发布平台:GitHub 或 Gitee(利用其 Pages 服务托管静态文本文件)。( GitHub )
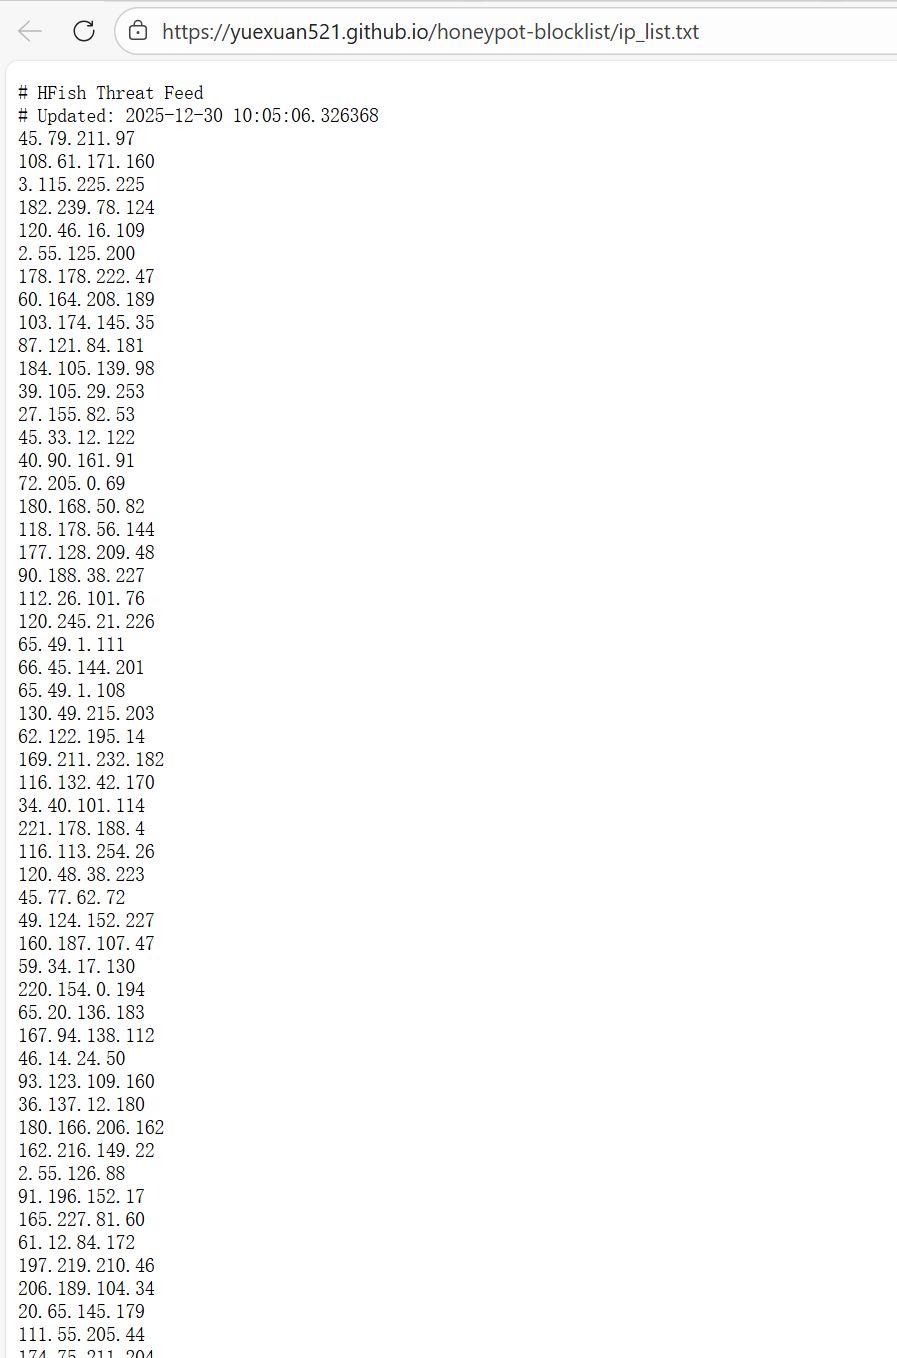
最终产物:一个公网可访问的 URL(例如 https://yuexuan521.github.io/honeypot-blocklist/ip_list.txt)。
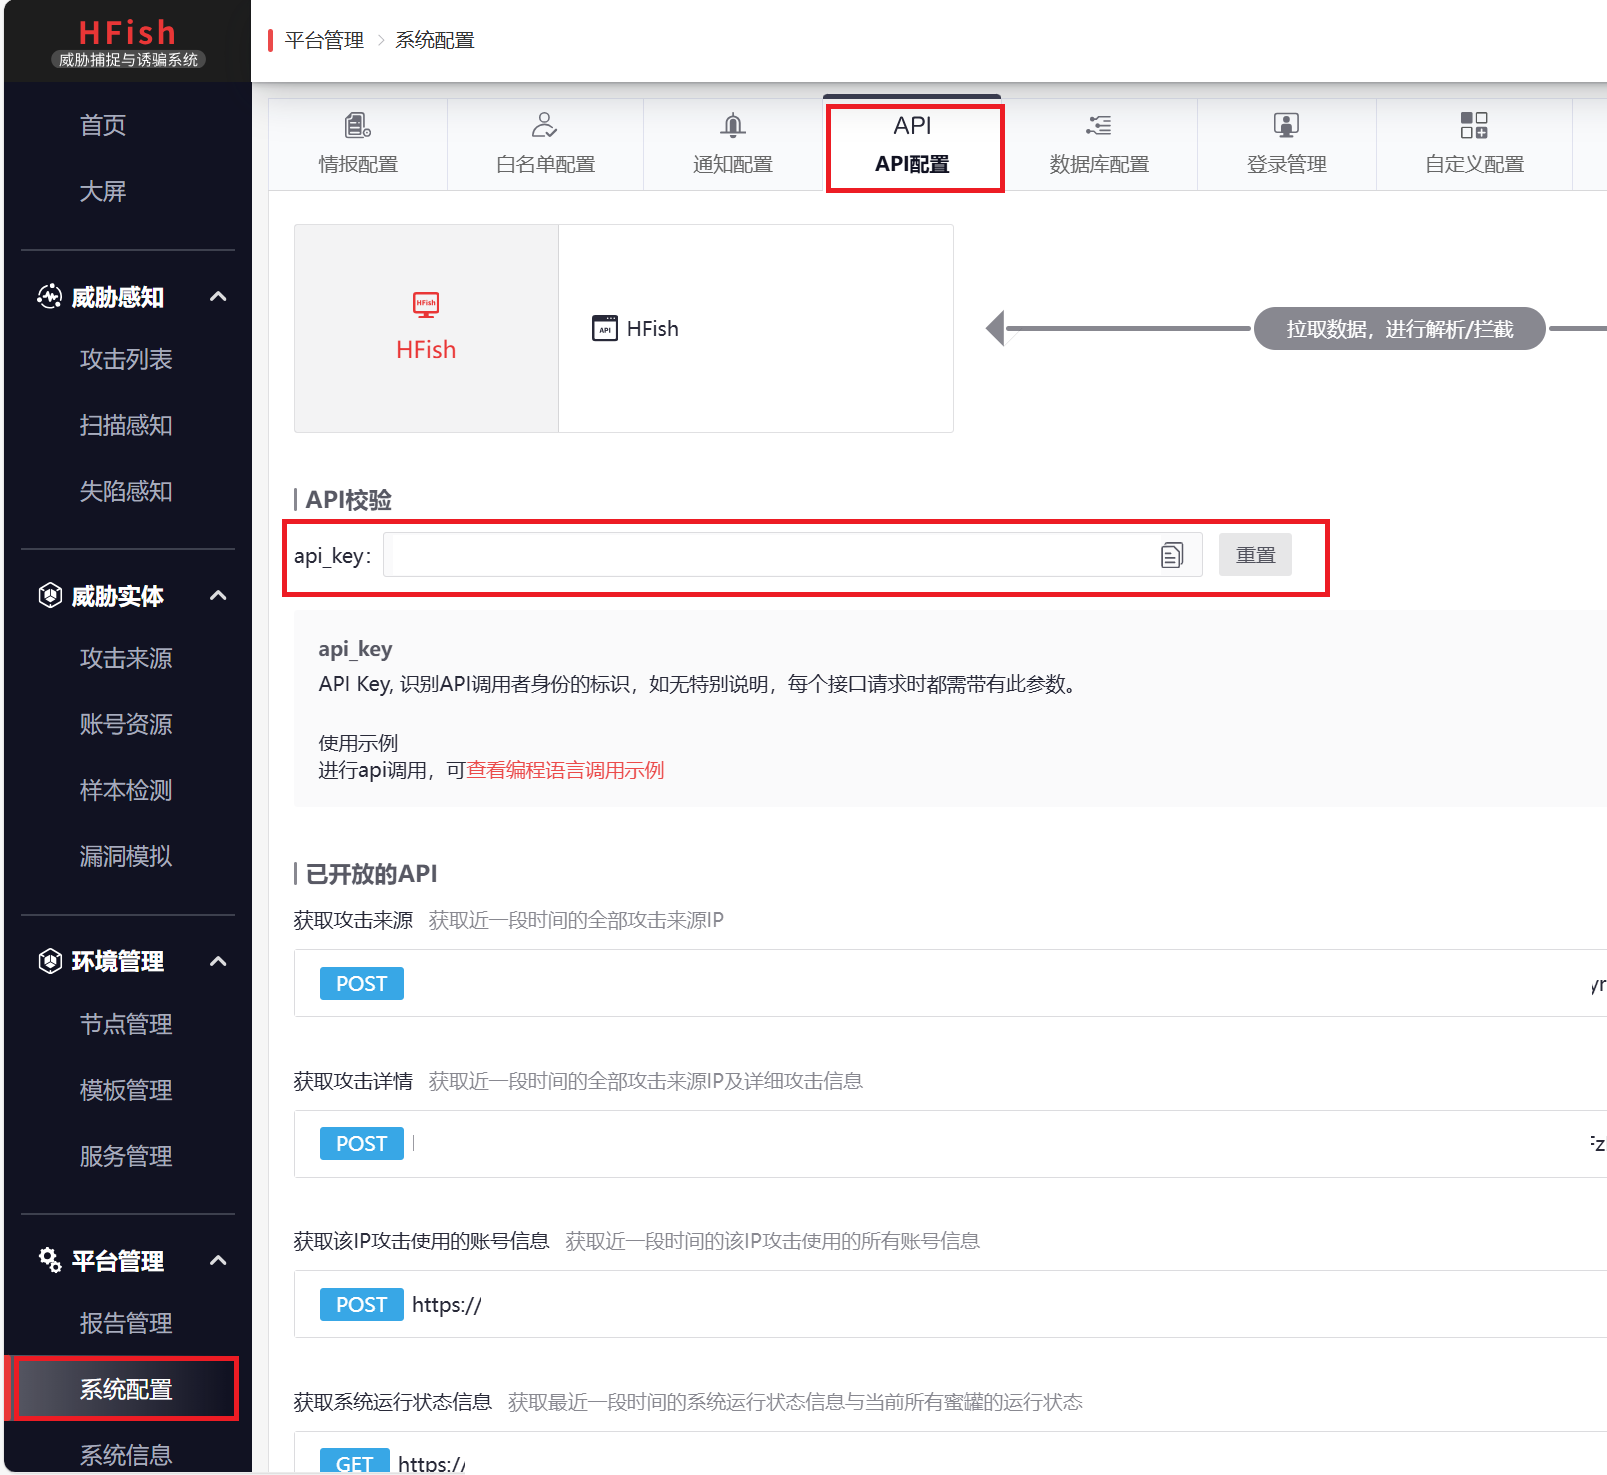
第一步:准备 HFish API
HFish 提供了 API 用于获取攻击数据。
- 登录 HFish 管理后台。
- 进入 “系统设置” -> “API 设置”。
- 获取 API Key 和 管理端地址。
- 注意:如果你的 HFish 在内网,确保运行脚本的机器能访问到 HFish 的管理端口(默认 4433)。
第二步:编写自动化提取脚本 (Python)
我们需要编写一个 Python 脚本,完成“拉取数据 -> 过滤白名单 -> 格式化 -> 写入文件”的动作。
在 HFish 服务器或能访问 HFish 的机器上创建 /root/generate_feed.py:(需修改HFISH_HOST、API_KEY、OUTPUT_TXT的值,第10行)
| |
第三步:建立开源仓库 (GitHub/Gitee)
- 在 GitHub 上创建一个新仓库,例如
honeypot-blocklist。 - 在你的服务器上安装 Git,并克隆该仓库。(
yourusername改成你的用户名)
| |
修改上面的 Python 脚本配置,将输出路径指向这个 Git 目录。
第四步:自动化更新与推送 (Shell + Crontab)
1、编写自动化 Shell 脚本
编写一个 Shell 脚本 update_feed.sh,将“生成”和“推送”结合起来:
创建脚本文件:
1vim /root/update_feed.sh写入以下内容:(需修改git user.name和user.email,推荐 ✅使用 GitHub 提供的隐私邮箱)
GitHub隐私邮箱特点:既能保护你的真实邮箱不泄露,又能让 GitHub 识别出这是你的账号,给你的 GitHub 贡献墙(Contributions Graph)加“绿格子”。
- 登录 GitHub,进入 Settings(设置) -> Emails。
- 勾选 “Keep my email addresses private”。
- 你会看到一个类似这样的邮箱:12345678+你的用户名@users.noreply.github.com。

配置方法:(修改5. 配置 Git 身份)
1
2
git config user.name "你的GitHub用户名" git config user.email "12345678+你的用户名@users.noreply.github.com"1 2 3 4 5 6 7 8 9 10 11 12 13 14 15 16 17 18 19 20 21 22 23 24 25 26 27 28 29 30 31 32 33 34 35 36 37 38 39 40 41 42 43 44 45 46 47 48 49 50 51 52 53 54 55#!/bin/bash # ================= 配置路径 ================= PY_SCRIPT="/root/generate_feed.py" GIT_REPO="/root/threat-feed" LOG_FILE="/var/log/hfish_feed.log" # =========================================== echo "-----------------------------------------------------" >> $LOG_FILE echo "[$(date)] Starting update process..." >> $LOG_FILE # 1. 进入 Git 仓库目录 (这一步必须最先做) cd $GIT_REPO || { echo "[Error] Cannot cd into $GIT_REPO" >> $LOG_FILE; exit 1; } # 2. 【新增】先拉取远程更新 (防止 Push 冲突) # 这一步会把你在 GitHub 网页上改的 README 同步到本地 echo "[-] Pulling remote changes..." >> $LOG_FILE if git pull origin main >> $LOG_FILE 2>&1; then echo "[Info] Git pull successful." >> $LOG_FILE else # 如果 pull 失败(极少见),通常是因为冲突,记录日志但不退出,尝试强制覆盖 echo "[Warn] Git pull failed (Conflict?). Will try to push anyway." >> $LOG_FILE fi # 3. 执行 Python 提取 IP # 注意:即使 git pull 失败了,我们也要生成新数据,因为数据才是核心 /usr/bin/python3 $PY_SCRIPT >> $LOG_FILE 2>&1 # 4. 检查文件是否生成 if [ ! -f "ip_list.txt" ]; then echo "[Error] ip_list.txt missing. Python script failed?" >> $LOG_FILE exit 1 fi # 5. 配置 Git 身份 git config user.name "" //!!填写你的name和email!! git config user.email "" # 6. 提交并推送 git add . if git commit -m "Auto update: $(date "+%Y-%m-%d %H:%M")" >> $LOG_FILE 2>&1; then echo "[Info] Changes committed." >> $LOG_FILE # 尝试推送 if git push origin main >> $LOG_FILE 2>&1; then echo "[Success] Pushed to GitHub." >> $LOG_FILE else echo "[Error] Git Push failed. Retrying with --force..." >> $LOG_FILE # 如果普通推送失败,尝试强制推送 (慎用,但在这种只增不减的情报源场景下是可行的) # git push -f origin main >> $LOG_FILE 2>&1 fi else echo "[Info] No changes detected. Nothing to push." >> $LOG_FILE fi赋予执行权限:
1chmod +x /root/update_feed.sh
2、配置 SSH 免密推送(关键!)
自动化脚本在后台运行时,无法输入 GitHub 的账号密码。你必须配置 SSH Key。
检查是否已有 Key:
1ls ~/.ssh/id_rsa.pub- 如果有文件,跳过第2步。
- 如果没有(报错),执行第2步。
生成 Key(一路回车即可):
1ssh-keygen -t rsa -b 4096 -C "hfish-feed"获取公钥:
1cat ~/.ssh/id_rsa.pub- 复制输出的内容(以 ssh-rsa 开头的一长串)。
上传到 GitHub:
打开 GitHub 仓库 -> Settings -> Deploy keys -> Add deploy key。
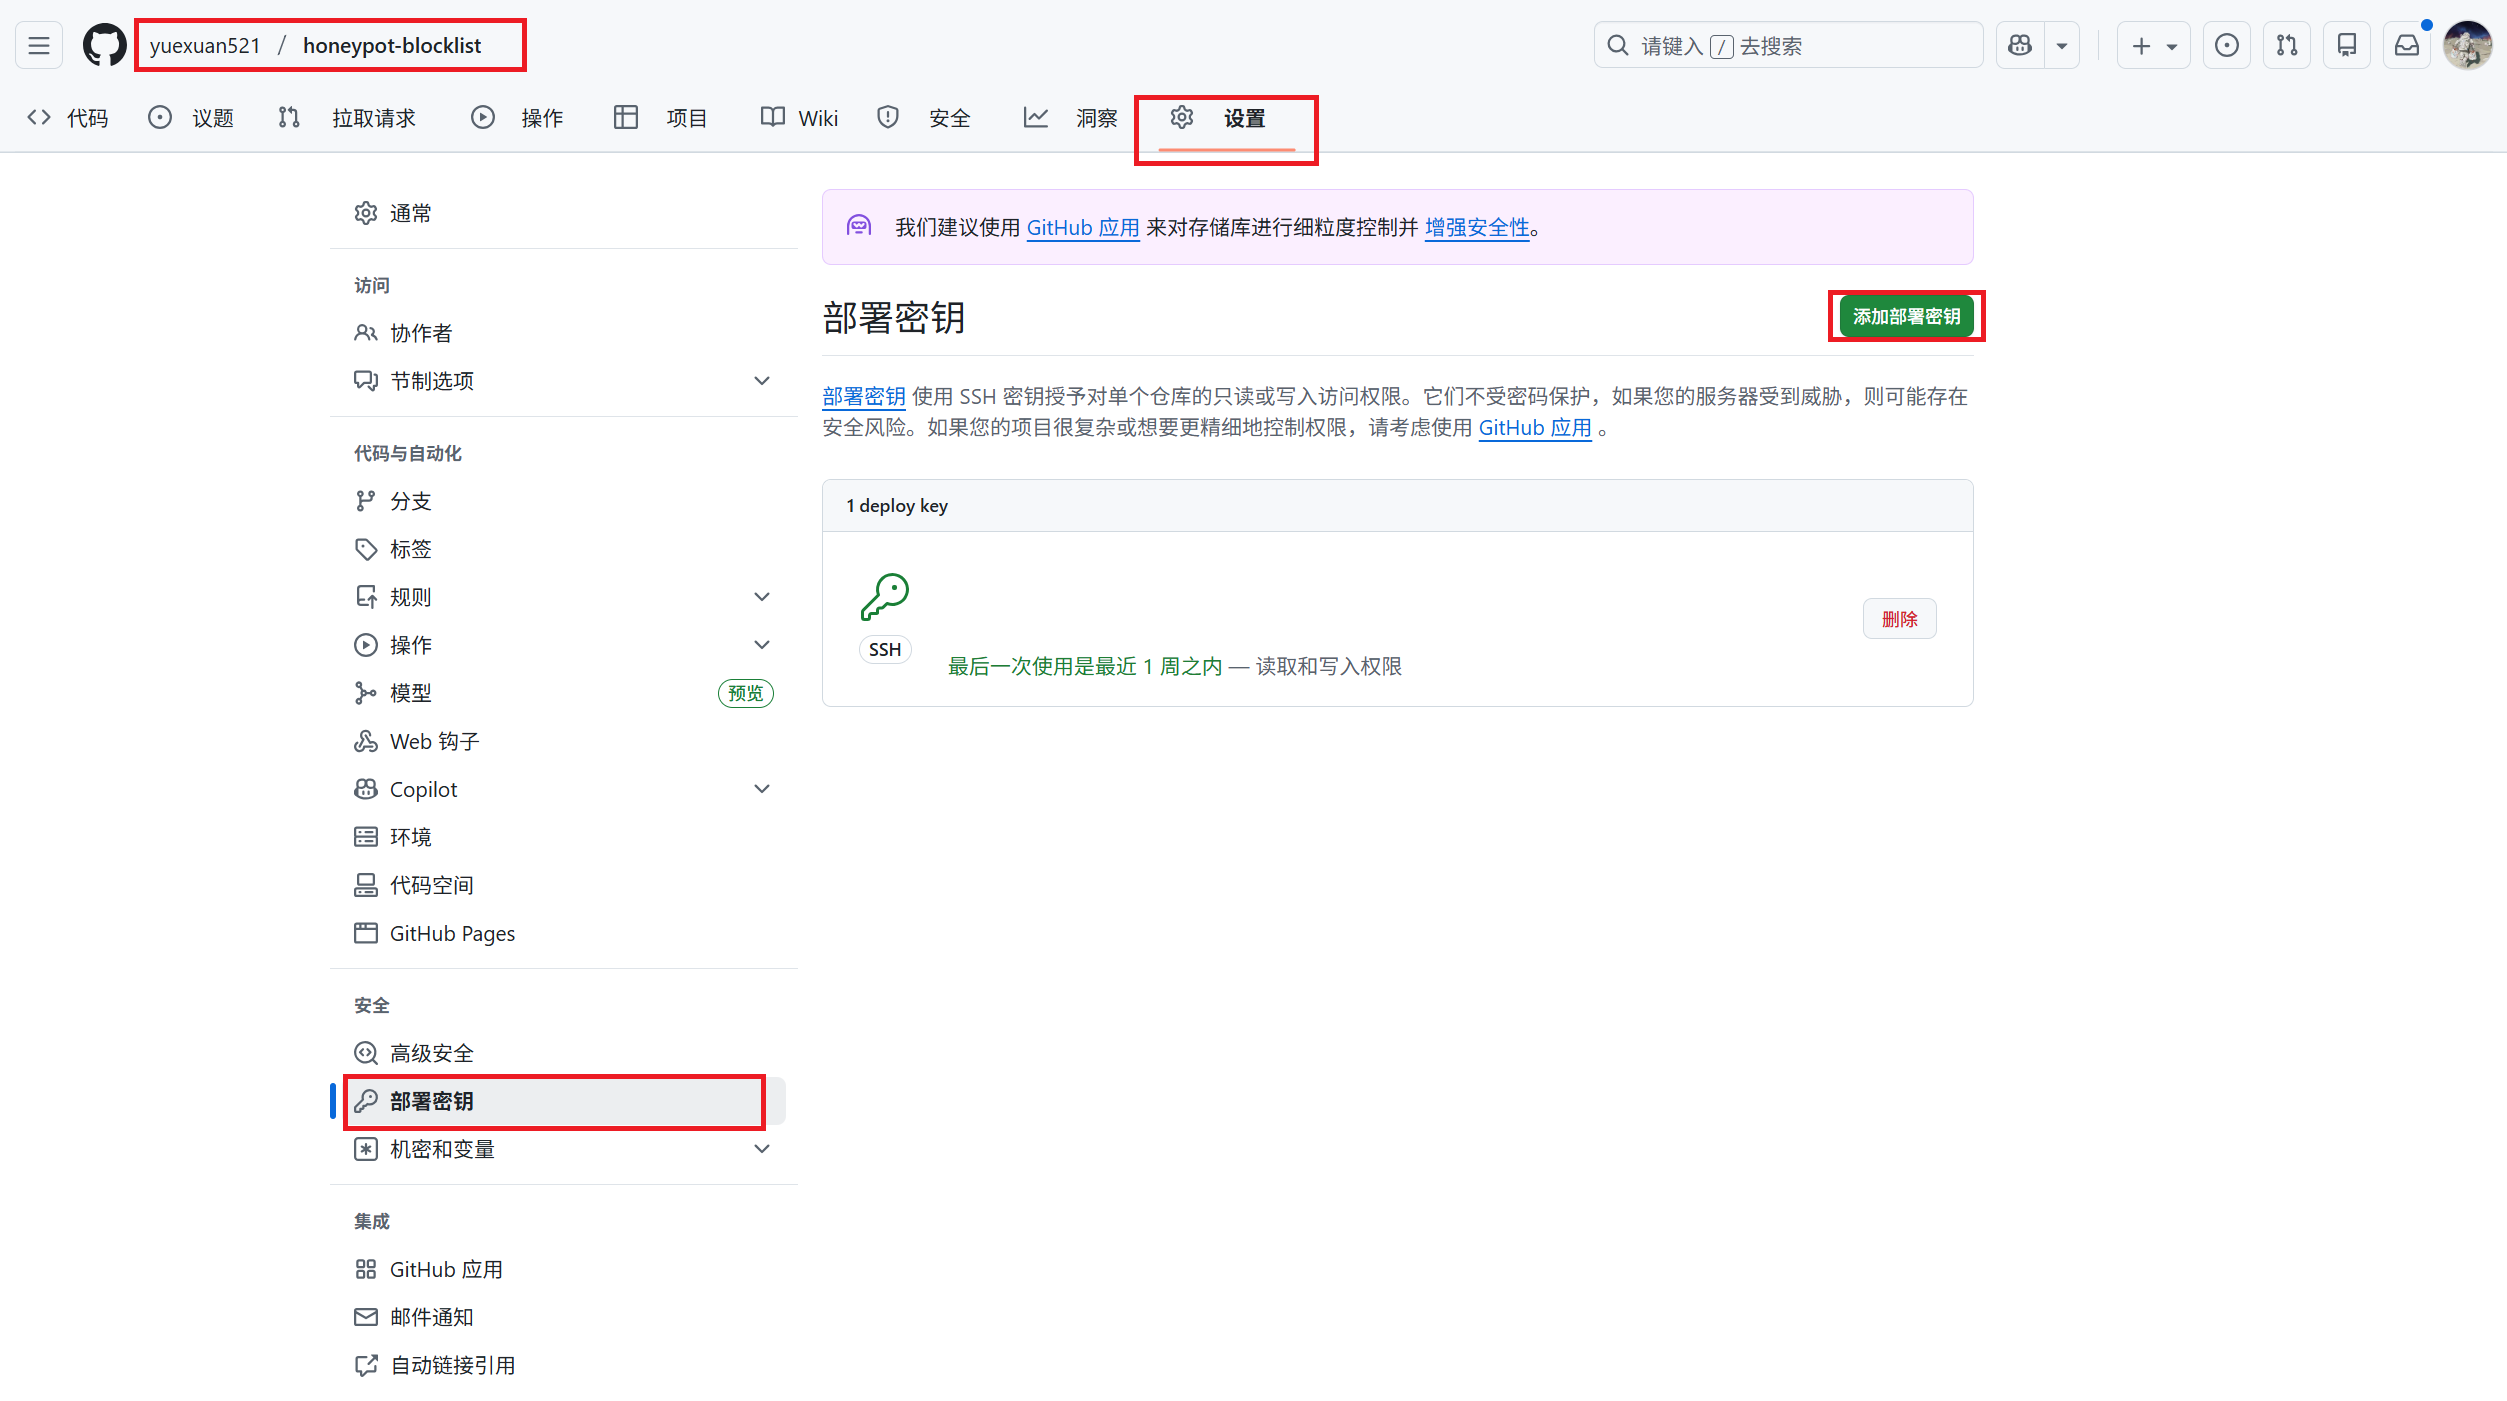
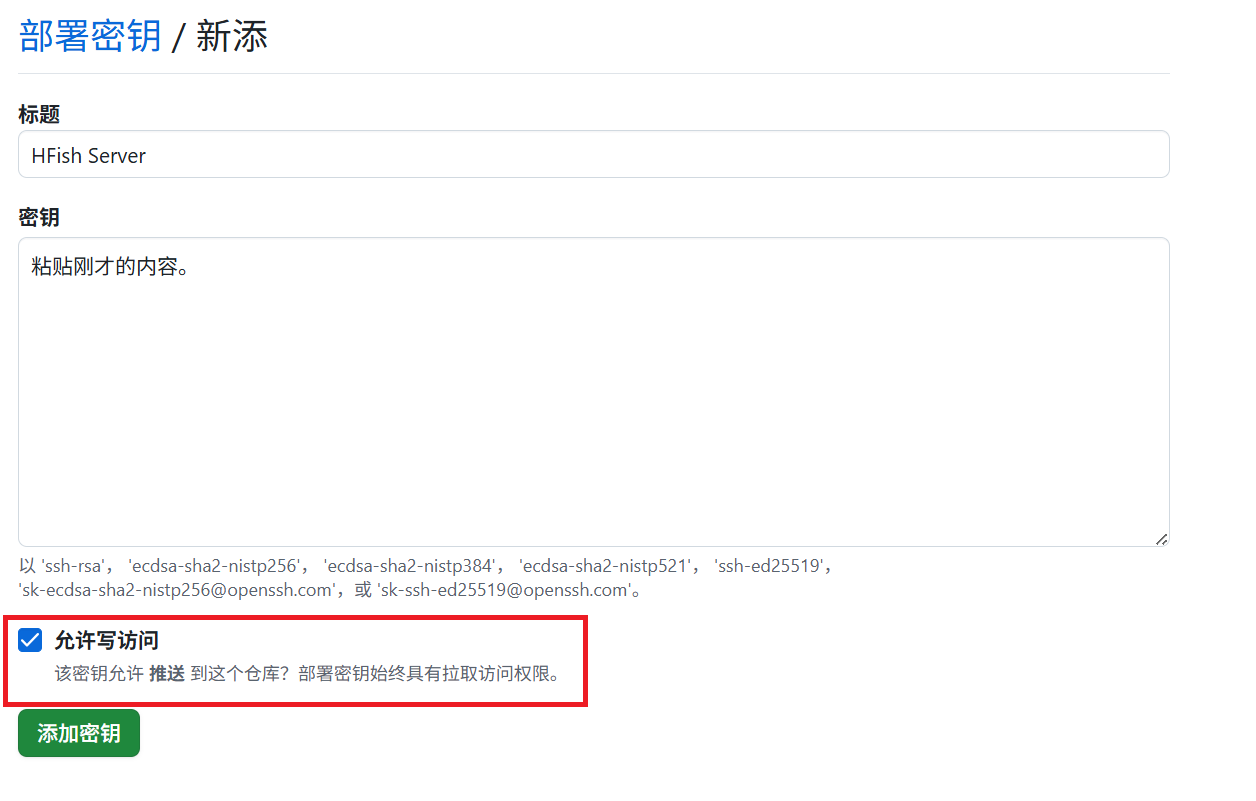
Title: HFish Server
Key: 粘贴刚才的内容。
重要:勾选 Allow write access(允许写入权限),否则无法推送!
手动测试连接(必须做一次!): 在服务器执行:
1ssh -T git@github.com- 输入 yes 确认指纹。
- 如果看到 Hi
<username>/<repo>!You’ve successfully authenticated…,说明通了。
修改仓库地址为 SSH(如果你之前是用 HTTPS clone 的): 进入目录检查:
1
2
cd /root/threat-feed git remote -v如果显示 https://github.com/…,请执行:
1git remote set-url origin git@github.com:你的用户名/你的仓库名.git
3、手动测试全流程
现在我们手动运行一次 Shell 脚本,看看能不能成功推送。
| |
检查结果:
- 看日志:tail -f /var/log/hfish_feed.log
- 看 GitHub 网页:刷新你的仓库,看看 ip_list.txt 更新时间是不是变成了 “Just now”。
4、设置定时任务 (Crontab)
确认手动运行没问题后,最后一步是让它自动跑。我们设置为 每 2 小时更新一次(既保证新鲜度,又不浪费资源)。
编辑定时任务:
1crontab -e在文件末尾添加一行:
1
2
# 每 2 小时的第 5 分钟执行一次 (错峰执行) 5 */2 * * * /bin/bash /root/update_feed.sh保存退出(如果是 vim,按 Esc 输入 :wq 回车)。
第五步:开源给他人使用
现在,你的 GitHub 仓库中会有 ip_list.txt。你需要开启 GitHub Pages 功能(在仓库 Settings -> Pages 中开启)。
- 进入该仓库的 Settings (设置)。
- 在左侧侧边栏找到 Pages。
- 在 Build and deployment 下的 Source 选择 Deploy from a branch。
- 在 Branch 处选择 main (或 master) 分支,文件夹选择 / (root)。
- 点击 Save。
一旦开启,你就得到了一个全球可访问的永久直链,例如: https://yourusername.github.io/honeypot-blocklist/ip_list.txt
等待 1-2 分钟后,GitHub 会生成页面,别人只需要订阅这个以 .txt 结尾的 URL 即可。
别人可以这样使用我们的数据:
- PaloAlto/Fortinet 防火墙:创建一个 “External Dynamic List”,填入你的 URL。
- Linux 服务器:写个脚本 wget 你的文件并导入 ipset。
效果展示: